


簡単な2Dゲームを作ろう
2Dゲーム制作の練習シリーズです。
アンリアルエンジンで2Dゲーム制作方法をまとめていきます。
説明を省略したり、細かな数値設定などの説明をしない場合もありますので、ご参考程度で確認ください。
※作業環境:UEバージョン5.3.2 Windows11 VSCode
プレイヤーの操作を変更
以前作った移動方法では左右にまっすぐ移動できないので、今回はコードを見直します。
キーを押した方向にまっすぐ進めるようにします。
コードを編集する
PlayerCharacter.h
既存コード
    // 既存コード
    void Move(const FInputActionValue& Value);
変更後のコード
    // 変更
    void MoveTriggered(const FInputActionValue& Value);
	void MoveCompleted(const FInputActionValue& Value);
これは、キーを押している間の処理と、押し終わった後の処理を入れる関数になります。
既存コード
    // 既存コード
    UPROPERTY(BlueprintReadWrite)
	float RotationSpeed = 100.0f;
変更後のコード
    // 変更
    UPROPERTY(BlueprintReadWrite)
	FVector2D MovementDirection;
上下左右ともにまっすぐ進めたいので「RotationSpeed」は不要になり、代わりに移動する方向を確認できるようにしています。
PlayerCharacter.cpp
先ほど変更した関数を作成します。
// 追加↓
void APlayerCharacter::MoveTriggered(const FInputActionValue &Value)
{
	FVector2D MoveActionValue = Value.Get<FVector2D>();
	GEngine->AddOnScreenDebugMessage(-1, 2.0f, FColor::White, MoveActionValue.ToString());
}

void APlayerCharacter::MoveCompleted(const FInputActionValue &Value)
{
	GEngine->AddOnScreenDebugMessage(-1, 2.0f, FColor::Red, TEXT("MoveCompleted"));
}
// ここまで↑
まずは入力値が取得できているか確認するコードにしています。
既存コード
// 既存コード
void APlayerCharacter::SetupPlayerInputComponent(UInputComponent* PlayerInputComponent)
{
	Super::SetupPlayerInputComponent(PlayerInputComponent);

	UEnhancedInputComponent *EnhancedInputComponet = Cast<UEnhancedInputComponent>(PlayerInputComponent);
	if (EnhancedInputComponet)
	{
		EnhancedInputComponet->BindAction(MoveAction, ETriggerEvent::Triggered, this, &APlayerCharacter::Move);
	}
}
変更後のコード
void APlayerCharacter::SetupPlayerInputComponent(UInputComponent* PlayerInputComponent)
{
	Super::SetupPlayerInputComponent(PlayerInputComponent);

	UEnhancedInputComponent *EnhancedInputComponet = Cast<UEnhancedInputComponent>(PlayerInputComponent);
	if (EnhancedInputComponet)
	{
// 編集&追加↓
		EnhancedInputComponet->BindAction(MoveAction, ETriggerEvent::Triggered, this, &APlayerCharacter::MoveTriggered);
		EnhancedInputComponet->BindAction(MoveAction, ETriggerEvent::Completed, this, &APlayerCharacter::MoveCompleted);
		EnhancedInputComponet->BindAction(MoveAction, ETriggerEvent::Canceled, this, &APlayerCharacter::MoveCompleted);
// ここまで↑
	}
}
元々あったMove関数が変更になったので、それに合わせてコードを変更しています。
既存のMove(const FInputActionValue &Value)関数は削除します。
// 削除↓
void APlayerCharacter::Move(const FInputActionValue &Value)
{
	FVector2D MoveActionValue = Value.Get<FVector2D>();
	if (CanMove)
	{
		if (abs(MoveActionValue.Y) > 0.0f)
		{
			float DeltaTime = GetWorld()->DeltaTimeSeconds;

            if (abs(MoveActionValue.X) > 0.0f)
			{
				float RotationAmount = RotationSpeed * MoveActionValue.X * DeltaTime;
				AddActorWorldRotation(FRotator(RotationAmount, 0.0f, 0.0f));
			}

			FVector CurrentLocation = GetActorLocation();
			FVector DistanceToMove = GetActorUpVector() * MovementSpeed * MoveActionValue.Y * DeltaTime;

			FVector NewLocation = CurrentLocation + DistanceToMove;
			SetActorLocation(NewLocation);
		}
	}
}
// ここまで↑
テストプレイして入力値の確認をする
ここまで出来たら、リフレッシュ&コンパイルします。
正常にコンパイル出来たらプレイして確認します。
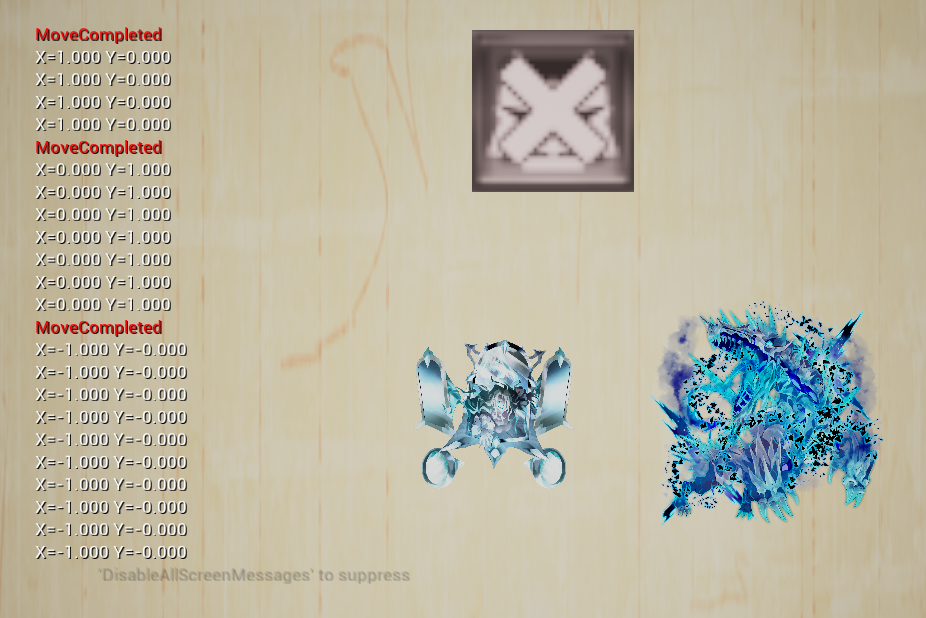
キーを押しているときは値が表示され、キーを離すと「MoveCompleted」が表示されます。
キーと表示される値の関係は、こんな感じ
| A | X=-1.0,Y=0.0 |
| W | X=0.0,Y=1.0 |
| S | X=0.0,Y=-1.0 |
| D | X=1.0,Y=0.0 |
以下の記事で行っていた内容です。
プレイヤーを移動させるコードに変更する
入力に対して値が正常に表示されたら、プレイヤーを移動させるコードを作成していきます。
PlayerCharacter.cpp
void APlayerCharacter::MoveTriggered(const FInputActionValue &Value)
{
	FVector2D MoveActionValue = Value.Get<FVector2D>();

// 編集&追加↓
	// GEngine->AddOnScreenDebugMessage(-1, 2.0f, FColor::White, MoveActionValue.ToString());
    if (CanMove) // 移動可能なら
	{
		MovementDirection = MoveActionValue; // 移動方向をセットする
    }
// ここまで↑

}

void APlayerCharacter::MoveCompleted(const FInputActionValue &Value)
{
// 編集&追加↓
	// GEngine->AddOnScreenDebugMessage(-1, 2.0f, FColor::Red, TEXT("MoveCompleted"));

    MovementDirection = FVector2D(0.0f, 0.0f); // 移動を止める
// ここまで↑
}
void APlayerCharacter::Tick(float DeltaTime)
{
	Super::Tick(DeltaTime);

// 追加↓
	if (CanMove) // 移動可能で
	{
		if (MovementDirection.Length() > 0.0f) // 移動方向のベクトルが0より大きい場合
		{
			if (MovementDirection.Length() > 1.0f) // もし移動方向のベクトルが1より大きいなら
			{
				MovementDirection.Normalize(); // ベクトル値を正規化(ノーマライズ)する
			}

			FVector2D DistanceToMove = MovementDirection * MovementSpeed * DeltaTime; // 移動距離を求める
			FVector CurrentLocation = GetActorLocation(); // 現在の位置を取得する
			FVector NewLocation = CurrentLocation + FVector(-DistanceToMove.X, 0.0f, DistanceToMove.Y); // 新しい位置を求める

            SetActorLocation(NewLocation); // 新しい位置に移動する
		}
    }
// ここまで↑

}正規化(ノーマライズ)は、向きを変えずにベクトルの長さを1にすることです。
これにより、ベクトルの移動距離に影響せず、方向のみを示すことができます。
テストプレイする
これでコードは完成したので、リフレッシュ&コンパイルします。
正常にコンパイル出来たらプレイして確認します。

プレイヤーが上下左右に移動出来ればOKです。
プレイヤーの操作変更完了
今回はここまでです。
次回は「プレイヤーの動きに合わせて絵を変化させる」です。
前後記事
他の記事を探す
他の記事も気になる方は、以下の記事の目次を確認ください。
